(transcribed from this video)

Hello guys it’s Lee here for IMineBlocks.

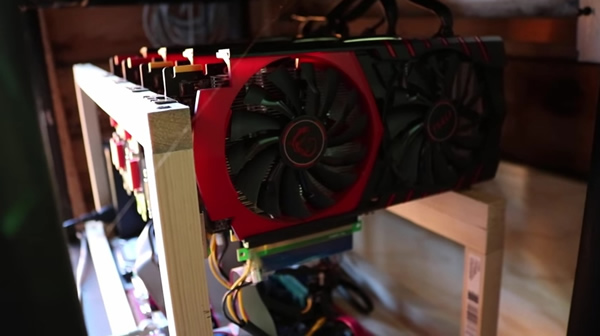
In this video I just wanted to share with you something quite cool so we’ve just had a really cold frosty night and I think it went down to between -5C & -8C last night so I wanted to show you the elcheapo rig which is the one with four R7 370’s that’s actually in my shed so I just want to show you the performance that you get with that one and also really low running temperatures so I’m going to share that with you guys now.

frosty1

So I’ll show you the screen capture first and then we’ll actually take a look at the actual machine itself and take a look at up close and we’ll see how cool it’s running.

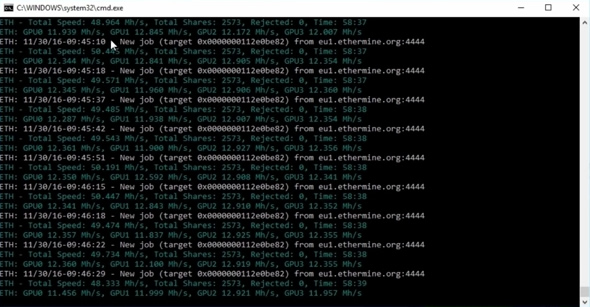
Ok so we have just logged into the elcheapo rig using teamviewer so you can see we’ve got the claymores GPU miner running in the background like say this machine has four r7 370 that are the 4GB versions and MSi brand, pretty good GPUs overall. We are getting just under 50 Mega hashes per second and we’re using a little over 500 watts on this machine but what I really wanted to show you was the actual GPU temperatures. So these cards are quite low power they use around about a hundred watts per GPU and that’s quite low power anyway but at the moment the ambient temperature is a little over 5 degrees but the actual GPUs are getting really cool temperatures so we’re less than 65 degrees Celsius in most cases.

frosty2

I also want to show you the actual fan speeds as well as I go down the charts you can see they’re all nearly one hundred percent utilization so they’re mining at full steam ahead and the cards also overclocked and so you can see the actual core clock is up higher and also the memory clock and we’ve got a little bit increase on the actual power in the cards but if we focus back on the actual hardware tab you can see GPU one is running between sort of ten and fourteen percent fan speed and same sort of numbers for GPU 2 a little bit faster for GPU 3 at seventeen percent fan speed and GPU 4 which the one that will be on the very end is running the coolest and that’s using seven percent fans speed so those fans are all rotating really slowly.

frosty3

If we just take a look at the actual custom fan profile you can see I’ve just been sort of experimenting myself. We’re not running this fan profile at the moment I’m just using the automatic settings but I think we could probably take it down to zero fan speed up to 70 degrees and then from there it’s going to rock it right the way up so let’s click ok we’ll go with this custom fan seconds and we’ll just see how that increases the actual temperatures of the GPUs and where they go over 70 degrees or I think probably they will pick up hate quite quickly but I don’t feel we are you know going to be at any risk of actually overheating the cards or anything like that because it’s just so cold outside and I’ll show you that in just a moment we’ll see exactly how cold it is.

frosty4

So you can see the temperatures are picking up slightly too, the fans are probably just kicked in now actually yeah you can see on this the two middle gpus they’re the ones that always going to be the warmest because they’re on the middle of the rack and they just picked up a little bit of fans speed there now and I was hoping to get it to a point where they would be completely stopped and I did it for just a little while but now they’ve just kind of crept over that 70 degrees temperature but like I say you can still see the actual fan speeds are very slow because of the ambient temperature so I’ll just turnoff the custom profile now just let go back to default. It will pick up initially but then it will go back down to more stable between that ten to fifteen percent fan speed.

frosty5

Ok so I’ve just been recording just for a minute and you can really hear how quiet the actual rig is running and it’s running super cool and super quiet. So I just wanted to share with you the running of rigs in these cold winter conditions. It’s really frustrating here today and I’m glad to be back indoors warming up a little bit but I’m perfectly happy to keep the miner outside and keeping them running nice and chilled because its going to get better efficiency than in the summer time. It’s much easier to mine in these winter conditions than it is in the summer conditions dealing with heat is a real problems specifically for GPU miners or mining in general if you have a cluster of machines.

nicehash-main

Testing the updated Nicehash miner V1.6.1.4

If you’ve not used the Nicehash miner before I’ll quickly explain how it works, because it’s a little different to other mining software. Nicehash is not just a miner, it connects to a market of buyers and sellers of hashing power and so when you mine using the Nicehash miner it will mine the most profitable coin with your hardware and then sell this on the open market in exchange for Bitcoins. So you can be mining Ethereum but you’ll actually be paid in Bitcoin.

Download Link – Nicehash Miner V1.6.1.4

Once you have downloaded and extracted the zip file to a folder of your choice, click the NiceHashMiner.exe to get started.

nicehash-folder

In the main window you’ll need to add your own bitcoin address and worker name as reference you can use to see your stats online. Then you want to click the Benchmark button.

nicehash-main

The benchmarking process tests your computers hardware to see how it perform when mining different coins and this data can then be used by Nicehash to decide which coins to mine and when for the best overall profitability.

Here’s the benchmark results from my two R7 370’s and you can see the coin algorithms in the center and hash speed on the right. The bench mark can take sometime to complete, a few minutes for each algorithm.

nicehash-benchmark

Once the bench is complete you can close the window and return to the main miner window.

Select the hardware you wish you use and then click the Start button. The miner will choose which mining algorithm is the most profitable and then start up the mining software for that coin. In my case Ethereum (DaggerHashimoto) is selected and the mining begins.

nicehash-mining-ethereum

After a short period of time you’ll see the earning summary being update and this confirms your hashrate and expected daily earnings and also your bitcoin balance at Nicehash. (payouts are done 3-4 times a day).

In testing I did notice that mining Ethereum using Nicehash the hash rate was 27.25 Mh/s and this is a little slower than the 28.08 Mh/s when using Claymore’s Dual Eth miner in Eth only mode. However the difference is a minor consideration when compared with the benefit of auto exchanging for Bitcoin.

Overall the miner performs well and should provide decent profits to miners without the hassle of switching mining software to match the days most profitable coin.


sia-gpu-600x

Instruction guide for mining Siacoins using your AMD or Nvidia Graphics Card (GPU Mining).

Step1. Get a Siacoin address (guide on wallet/address creation) or alternative you can use an exchange address to receive your siacoin rewards from the pool.

Step2. Download the Marlin Siacoin Miner which is currently the best and most compatible miner for GPU mining.

Step3. Unzip the miner files to a folder on your computer.

Step4. Edit the Start.bat file with notepad and update it with your details. There’s only two parts that need to be changed

SET address=002d16d5194043c76beb5cc7d2d9f04c9657ce38ee692c25471302974c3c4e42040328d0c555

Change this to your own address

SET worker=workerx

Change this to a nickname of your choice

sia-miner-batch

Here’s what our Start.bat file contains

:: Batch file sample for Marlin
:: Written by Xurious for SiaMining.com
:: Sia Address: 00091d9619f1e697ddf80e751b68baffc444e7b59eeb54e131f136711d84aebf3bc6e0b820af
:: Updated 2016-08-04
::
:: Your Payout Address.
SET address=002d16d5194043c76beb5cc7d2d9f04c9657ce38ee692c25471302974c3c4e42040328d0c555
:: Worker Name.
SET worker=workerx
:: Intensity. 21 is great for normal desktop usage. 28 is typical for mining.
SET intensity=21
::
marlin.exe -u %address%.%worker%” -I %intensity%

Save the file. Ensure it saves as .bat and not .bat.txt

Step5. Double click on the Start.bat icon to start the Siacoin Miner.

Here’s my results from two MSi R7 370 4GB = 939 MH/s

siacoin-marlin-miner

Step6. Check your stats on the Siamining.com pool by visiting the website and entering your Siacoin address.

I hope you found this guide to be helpful in your mining efforts. Any questions or comments please leave them below and I’ll respond as soon as I can.
Siacoin donations are appreciated or if you prefer you can share some of your mining time by running the Start.bat with my Siacoin address: 002d16d5194043c76beb5cc7d2d9f04c9657ce38ee692c25471302974c3c4e42040328d0c555